Configure Page List

Showing posts with label Gallery 2010. Show all posts

Tuesday, January 18, 2011

Happy 21st Birthday to you....

A card destined for my niece who is turning 21 today.  I cased this card from one of my favourite stampers Chat Wszelaki; details are below if you want to case.  This card design is very universal and could be used for many other occasions.  We have had quite a bit of humid weather lately with the storms that have been around and it's made my cardstock go limp. I'm thinking of using a heavier cardstock for my base to give it more strength; I'm finding the SU whisper white seems a little weightless and struggles to handle a lot of layering, especially when the weather is humid.  I've had a heavy book on this card to stop the card from bulging.  Sometimes I print my inside message on a coloured sheet and adhere this to the inside of the card.  I've found not all cardstock absorbs ink the same and there are differences in the quality of image so it's a matter of doing a test job if you want to see how well the heavier cardstocks ink up.

You may or may not of noticed that I've also changed my blog background.  It was time for a face lift big time......I got this one from HOT bliggity Blogs and I found these instructions super easy with installing a new background on your blog

I've also been trying to improve my card photography and found this link on Splitcoasters which you may find helpful for your projects.  Just putting your card on a slight angle I think has made a big difference and allows layers to be seen as in this card photo.  I'm still working on getting the light right.  The instructions also include how to edit in Photoshop which I'm struggling a little bit with, but I'll get there.  Here are the instructions from Amy Sheffer at http://www.splitcoaststampers.com/forums/photography-f217/htdt-7-22-09-photographing-your-papercrafting-projects-t515388.html

Stamps:  Just Believe and Perfect Punches
Paper:  Whisper White, Pretty in Pink and Chocolate Chip
Ribbon:  5/8" Grosgrain ribbon in Pretty in Pink
Ink:  Chocolate Chip and Pretty in Pink
Bigshot:  Square Lattice EF and  BeautifulWings Embosslits
Punches:  SU 2 x 1-3/8" oval punch
Accessories:  adhesive pearls, adhesive 'at home stash' numbers/alpha sheet and dimensions for the birthday sentiment.  The birthday image was trimmed around the oval border and then glued to the chocolate chip cardstock and punched out using the oval punch.  Hope you like it....I loved making it.  Thanks for dropping by.....keep smiling....Ann

Tuesday, December 21, 2010

Thinking of you....


I truly love everything about this card.  It is on its way to my cousin who lives in the UK.  I received her Christmas card the other day, which I always look forward to, as the English cards are so lovely with the winter scenes.  Unfortunately she has been diagnosed with bowel cancer.  I couldn't believe what I was reading when she told us, but I knew I had to make a very special card to send to her, to bring us closer together than the thousands of miles that separate us, and to give her a few minutes reprieve from the worry she must be having when she receives this, along with a special little gift. 

Another cased card from Chat at Me, My stamps and I, and it was exactly what I was looking for.  I replaced the covered button with a brad from the SU antique brads selection.   The DSP across the bottom was from a little pad I have called Queen Bee.  It is 6" x 6" and has a selection of 30 sheets, one of each design.

Thanks for dropping by.  Have a wonderful Christmas, with much laughter and happiness and best wishes for a safe, very healthy and prosperous 2011!

Kind regards, Ann

A gift from me to you....

This is the first card in a bundle of 12, I have made as a Christmas present for my son's partner Amy. Amy commented to me once that she loved the way I made the handmade cards....and I've always thought I would do her a mixed bundle of cards as part of her gift this year. I purchased a little box with a Christmas tree on the front to place them in. As the box was narrower than the standard envelopes I usually use, I had to make the cards slightly smaller to fit inside the box with a smaller standard envelope to go with them.

The first three cards use the SU set called 'Just Believe'. It is a gorgeous set, which has become one of my favourites, and has so many possibilities for its use.  I got the ideas for these cards by purchasing a kit from one of my favourite stampers, namely Chat Wszelaki.  It was the October 2010 Kit Tutorial available on her website.


This one was created quickly with the Elegant Lines embossing folder and the Beautiful Wings embosslits Dies, I just love these and the SU ones gives such a deep and crisp image.  The die comes with 5 differently sized butterflies, 4 embossed and one left plain.  The blue mounting piece behind the 'happy birthday' image is a sizzlit from the 'lots of tags' pack.

These little 3" x 3" cards are from another favourite card maker Stampin-Style with Mike. Here you will find all the info to case them if you wish. I just love mini cards and feel they can give just as much pleasure as a larger card. These mini's also use another little addition to my card resources, namely the 'movers and shapers die cutting system'. I haven't played with it much, except to make these cards, but can see again a lot of possibilities.


And finally, a little hedgehog from the SU 'Fun and Fast Notes' set.  The 3" x 3" cards are unable to be posted through Australia Post obviously because of their size.  Sometimes I don't put them in an envelope, but just adhere them to the top of the present for added pleasure. 

Thanks for looking.  Keep smiling, Ann

Monday, November 22, 2010

Birthday Blessings

Two postings in the one day, this will be a first...this card is for my mother-in-law for her 80th birthday.  It's another cased card by another favourite blogger No Time To Stamp; thanks Sharon.  She does some amazing cards and and has some great stuff to add to your wish list.  But I think her biggest favourite is her love of beautiful ribbons which are a delight to work with.  The one opposite is 1.25" Ivory pure silk and I used the large bow easy to make it.  If you zoom in you can see it is a double bow.

This was a large card (base 14 x 21 cm) due to the 'birthday blessings' sentiment (9 x8.5 cm) which was stamped in Night of Navy on Very Vanilla c/s.  The DSP is called Blue Awning and Sharon has the matching adhesive flowers which really do the card justice.  The little cut out in the top LH corner was a spellbinders die called Vintage Dies, there are 4 in the set and each are 2" x 2". I have been wanting to have a go at these for a while; they are excellent and to make it even better I purchased some time ago a little machine called a Xyron that turns them into stickers.  It takes cut outs up to 1.5" wide and you simply drop your cut out, right side up, down a little slot, pull on the tape at the other end and it draws your cut out through and places adhesive on the back of it....absolutely brillant for these fiddly little morsels.  I also had a go at using my new scallop trim punch too....just on the corners.  On the inside of the card I placed a strip of the blue poka dot DSP across the bottom, about 3cm in width, and placed in the centre of this a repeat of the spellbinder cut outs.  So yes as you can see I've had a great time in my little space of the house.

Thanks for dropping by, take care and keep smiling.....Ann

Just for you...Just Believe


My goodness it seems that long since I've actually made a card and posted on my blog, that for a minute there I completely forgot the process....has that happened to you??  DH has been away with work and of course I took the opportunity to stay up until midnight most nights catching up on some cleaning, ironing and more importantly creating, reading and learning how to use some new additions to my growing stamping collection.

This gorgeous simple card was made using the SU set called 'Just Believe'.  I absolutely love it!  This little creation was cased from one of my favourite sites Me, My Stamps and I, also found in the blogs I follow; thanks Chat.  It was Chat's October kit which I purchased and reproduced just to get back into the knack of making a card again.  Presently I'm feeling pretty flat, just tired, but so want to create and find casing a card for me, is the best way to go....at least something gets made.

Both these cards are exactly the same.  Both use the Woodland Walk DSP.  Products used were Very Vanilla as the base card, then topped with Kraft and then Very Vanilla embossed using the square lattice folder.  The four squares were Chocolate Chip c/s with the lovely Woodland Walk DSP.  It's topped off with the centre floral stamp and I used flowers from another set which I cut out and topped with an adhesive pearl, but Chat has used the itty bitty punch for her flowers - mine's in the mail!  The centre piece is also raised with a dimension as is the scallop oval on the top centre piece.  The top centre piece is made using the oval and scallop punches with the modern label punch carrying the sentiment.  It all comes together with a little chocolate chip 1/4" grosgrain ribbon.  Hope you like it.  Take care and keep smiling....Ann

Tuesday, September 21, 2010

Happy Birthday - Let's rock!

Let the music rock on....a birthday card for a special son who loves his music and does DJ-ing as a sideline.

A very simple design and I would have loved a little more time to play.  The base card was black cardstock highlighted with the music theme DSP purchased locally, some black grosgrain ribbon with the beautiful spellbinder die made from some at home rusty red cardstock, then the cirle and scallop necessability cutouts were added with a dimension and of course a couple of black adhesive pearls to help balance it all out.

I jazzed up the back flap of the envelope with the DSP. Just place a little glue to hold paper on flap and then trim around.  Really makes a difference.  Another idea I've tried is to run the envelope flap through my bigshot placing the flap in an embossing folder, now that really does look nice!

Another alternative design to the above would be to do a card around the 10 or 12 cm square, just play around with sizing to see what suits you.  Place the DSP on two-thirds of the front and place a series of scor lines on the black cardstock at the bottom.  Attach your ribbon and centre pieces.  This way I think the card would be more balanced and it would soften the starkness of the white background of the DSP.  What do you think....would love to hear your ideas?

Thanks for stopping by....take care and keep smiling...regards, Ann

Wednesday, September 1, 2010

Happy Father's Day

Oh how good if feels to make a card after what feels like such a long time.

It's an exciting time for DH and me as our eldest son is celebrating his first Father's Day on Sunday. The cards are made using the SU Build-A-Roo stamp set which I love. The text on Mark's card (right) was done in MS Publisher using the WordArt feature.  I had intended typing Happy First Father's Day but didn't want to take the limelight away from his partner Amy.  My hubby's card uses one of the arched quote stamps - the set comes with a great assortment of extra stamps for versatility.

The colour of the cards is real red with a textured grey cardstock; I'm disappointed with the photo though as they look more orange than red, but believe me the colour combo looks great - zoom in on them and they'll almost jump out at you!

I stamped the image twice using Staz On Jet Black which always gives a crisp result, and then glued the top roo on but left the hands, ears, nose and tail end free.  The hearts are stamped onto real red and then snipped out and adhered with a SU dimension and then the finishing touches of the self adhesive red kaiser pearl and stay put bow - this link will show you a great tutorial on the stay put bow http://wannastamp.blogspot.com/2007/11/stay-put-bow-video-and-blog-candy.html

Thanks for taking a peep and I hope your Father's Day is a memorable one.....Take care and keep smiling, Ann

Monday, June 14, 2010

Happy Birthday to you!

 
A birthday card for DH!...Just love this stamp set and especially the little 'love flower' which has become another favourite of mine.  As I was fingering through my cardstock collection my fingers kept backtracking to this beautiful buttery yellow card which has a slightly lined texture to it if you zoom in; I so wanted to use it.  I wasn't out for a lot of colour and wanted to keep the card simple but get the message through.  The staz on black ink was a perfect choice to give the images the crispness to detail they deserved.  A quick snip around and the little cute squares were gently adhered with a SU dimension.  Addition of the sentitment and a few accessories and there you go!

As the card developed and finally came to an end it took me a while to decide whether or not I liked it.  At first I thought it looked a bit drab and lacking life, but the more I looked at it close up, from a distance and overnight, I have decided that I now love it and am very happy with the finished result do you do that? I hope you like the photo it was an experiment to try and make my images more interesting.

RECIPE:
Stamps:  Dreams du Jour set
Paper:  SU basic black, at-home:  buttery yellow and rustic textured cardstock.
Ink: Staz on black - TIP:  adhere a small glue dot to the top of the clear cover (between the staz on lid and clear cover) and the clear cover will pop off with the main lid every time.  Stops inky fingers!
Accessories:  12 mm black grosgrain ribbon
Tools:  Paper piercing tool for corners
Card size:  15 x 10.5 cm     

Thursday, May 20, 2010

Hold on to the Memories...

This is a very special card for a friend who has recently lost her husband to cancer.  The card is on its way to Sweden as I type where I know it will be treasured and bring a smile to the recipient's face which is just what I want it to do.  A card even though for a sad moment, oozes elegance I think, and was made with a feminine touch in mind.

I put together a stick pin which I just snuck under the ribbon and this can be removed to be used either in hats, scarves, lapels of a jacket or simply as a keepsake if liked.  The length of the pin was 3".  Make sure you zoom in so you can see the detail.  The pieces for the hatpin ingredients were purchased from Many Horses Jewellery supply, the link is here http://www.manyhorses.com/store.htm.  I found their customer service to be exceptional and the quality of their products certainly worth investing in.

The flower is stamped initially as the base flower and then just the head is stamped twice more and snipped out and layered to give a dimensional effect; I just love this look.  The ribbon was attached with a little snail glue and then a larger glue dot under the knot silently holds it in place.  I already have ideas for a variation to this card so keep watching this space to see what appears!

Until next time...keep smiling and treasure every day....
Regards, Ann

RECIPE:
Stamps: Bloomin with Beauty, Close as a Memory
Paper: SU Barley Banana, at home textured navy cardstock, Whisper white, DSP from the Blue Awning series.
Ink: Staz on Black for flower and Night of Navy for sympathy text. 
Accessories: Kaiser half pearls, handcrafted hatpin, wide so saffron ribbon and dimensions to pop up the flower layers.  The flower was coloured using the stampin markers - overall colour was bashful blue, outline/shadow was ballet blue, centre of flower was more mustard and leaves/stem was sage shadow.
Tools:
Card Size:  12.5 cm x 21 cm

Sunday, April 11, 2010

No stamping...2 step bird punch - blue tones

I thought it would be good to take part in some challenges as a way of having to work with different layouts and see the variations that others create.  Well this is my second attempt at a challenge; namely the MOJO133 challenge. 

I had a great time working with this sketch even though it took me a couple of hours playing around.....but that's just me.  For me it's not just the creating but also the feeling of relaxation and all those feel good endorphins that come with it; my cards certainly come from the heart.

I look forward to taking part in other challenges as time permits and being happily challenged with more sketches and getting out of my comfort zone and trying new techniques. 
Hope you like it.
Until your next peep - keep smiling.....Ann

RECIPE:
Stamps:  Nil
Paper:  Stampin Up Whisper White card base, SU Night of Navy, grey textured c/s, SU Bella Bleu DSP, SU Creamy Caramel C/s.
Ink:  Nil
Accessories:  blue brads, stick on half pearl for bird's eye, rub on 'Make a Wish', dimension to adhere label, Spellbinder oval nestabilities.
Tools: 2-step bird punch, modern label punch, spellbinder oval die and bigshot.
Card size:  11 x 17 cm    

Saturday, April 10, 2010

Sending Birthday Wishes your way....


This card was cased from a new blog I was fortunate enough to come across belonging to Chat, from Me, My Stamps and I. Chat creates some absolutely beautiful cards and I always look forward to viewing her blog to see what else has appeared.  I thank her for this one.  You can check out Chat's blog from my blog roll.

This is not the greatest photo, the white background makes the card look insipid....I'm working on increasing my photography skills...any tips would be welcomed....I have Photoshop Elements 3 that came with a scanner as bundled software.  I haven't had a need to learn how to use it, but now there is a definite reason, so I'm challenging myself to improve in that area.  I am waiting on a text - PS Elements 3 in a classroom to arrive....I purchased a used copy for $11AUS with the addition of around $5.50 postage .... fantastic - the supplier was http://www.fishpond.com.au/ and they have both new and used books depending on what you're after .... do you ever think to purchase good quality used books?  If you're a book worm I think they would save you heaps and sometimes come with the added surprise of little notes the previous purchaser has kindly left for you as tips.  Now back to my card....

As you are probably aware by now I love the bosskut butterfly and have used it on many of my cards. This colour combo is a new one for me but one I like.  The floral paper is from a series called Lilac Avenue, a 6" x 6" pad of various patterned and embossed pages.  Available from Sharon Johnson another great US SU card maker from 'No Time to Stamp'.  The pad is a great size for cards as there is very little wastage.  The wider grosgrain ribbon with a lightly tied knot almost resembling a rosebud adds another dimension to the card.  The three window panels are DSP mounted on Chocolate Chip.

Hope you like it.  Keep smiling.....Ann

RECIPE:
Stamps:  Sincere Salutations
Paper:  Chocolate Chip, So Saffron, Whisper White, DSP
Ink:  Chocolate Chip
Accessories:  5/8" so saffron grosgrain ribbon, pearls, butterfly
Tools:  Big Shot machine, swiss dots embossing folder

Sunday, March 28, 2010

Delightful Mini

This would have to be my favourite mini at the moment.  I have re-created it so many times, it's quick and looks great.  Just by changing the colours and stamp sentiment allows you to use it for many occasions;  it's just so versatile.  I cased part of this card from a tri-fold card by Terri Walker, another US SU demonstrator and I thank her for her permission.

Hope you like it.  Keep smiling.....Ann

RECIPE:
Stamps:  Sincere Salutations
Paper:  At-home blue textured c/s, at-home beige textured c/s, whisper white, Bella Blue DSP
Ink:  Night of Navy
Accessories:  half pearl for bird's eye
Tools: 2-step bird punch
Card Size: 9 x 9 cm

Wednesday, March 10, 2010

Thinking of You...

This card is a smaller version of one previously created as a sympathy card...I love the colour combo.  The card was enclosed with a gift for a relative living in the UK so no envelope needed.  The trim inside the card helped to add balance to the colours I think.  There are two butterflies one BB and the other LL cardstock.  They are joined with mini glue dots.  I snipped the tail off the underneath butterfly on this one as it seemed to be in the way.

Hope you like it.
Keep smiling....Ann

RECIPE:
Stamps:  Sincere Salutations
Paper:  Barely Banana and Lavender Lace c/s
Ink:  Lavender Lace
Accessories:  Pearls and ribbon
Tools:  bigshot, Victoria embossing folder, bosskut butterfly, eyelet border punch
Card Size:  approx 12 x 14 cm

Saturday, February 6, 2010

Monogram Card

Another simple card which oozes elegance.  The two tone colour scheme gives a crisp and clean feel to this card.  The flourished frame embossing folder supports the monogram image which is highlighted on the spellbinders oval. The image is made up of a monogrammed 'M' from the JustRite Stamp deluxe set with the added damask border.  An at-home rub on just finishes off the story.

Hope you like it.
Keep smiling.....Ann

RECIPE:
Stamps:  JustRite Deluxe Monogram set and Damask border set
Paper: Lavender Lace and Whisper White
Ink: Lavender Lace
Accessories: pearls, rub on
Tools: Bigshot, flourished frame, spellbinders oval, Justrite stamps, scallop punch
Card Size: 15 x 10.5 cm

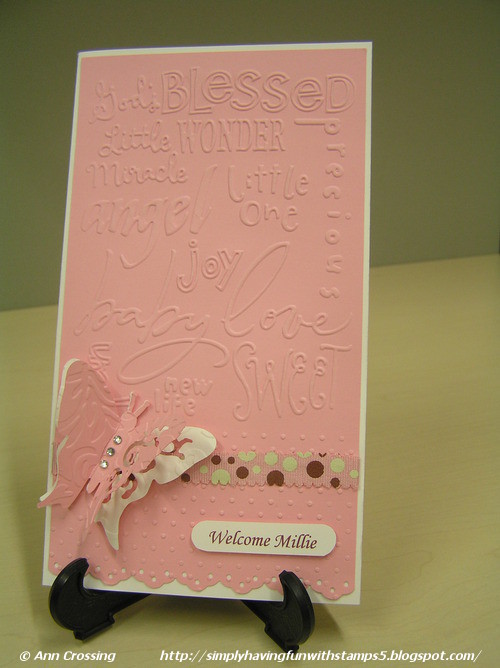
Welcome Millie - Embossed Baby Card


On 6 February 2010 our first grand-daughter Millie was born; oh how she just melts our hearts; isn't being a grandparent just the best thing!  This card was made to celebrate her welcoming into the world along with a cross-stitch for her wall, called Reading Bear by designer Maureen Christie. I think I've set a precedence now! Here's the link to the cross-stitch if you're interested http://www.vicstitch.com.au/p/367302/reading-bear---a-dmc-hobby-bears-cross-stitch-kit-from-maureen-christie.html

The bigshot played a big part in the creation of this card. When I saw cards in the US created using this machine I knew I just had to have one because I could see how it would allow me to move forward with my card making. I've never regretted it and can thoroughly recommend it if you're looking to take a step up!

I hope it makes you smile.........have a wonderful day.
Ann

RECIPE:
Stamps:  No stamping with this one.  The text was printed in brown using the computer and then a label was made by hand.
Paper:  SU Pretty in Pink, SU Whisper White cardstock
Ink:  SU Basic Brown
Accessories: poka dot ribbon, clear rhinestones and mini dimensions on label
Tools:  Bigshot - Cuttlebug embossing folders Baby and Swiss Dots, Bosskut butterfly die cut, Eyelet Border punch
Card size:  approx 22 x 11 cm

Sunday, January 17, 2010

With Heartfelt Sympathy

The stylish embossing and cutting machine called the Bigshot brings any card to life by adding texture and style with ease.  Simple embossing on the top half of this card and then the addition of the boskut butterfly (2), which is embossed by running through the swiss dots folder.  You just need to add a few pearls or rhinestones on the centre of the butterfly, ribbon and stamp and that's it!

Hope you like it.

Keep smiling.....Ann
RECIPE:
Stamps: Close as a Memory
Paper: Barley Banana, Lavender Lace
Ink: Lavendar Lace
Accessories:  Pearls, 1/4" Elegant Eggplant ribbon
Tools: embossing folders - Swiss dots, Victoria and bosskut butterfly, mini glue dots to hold the two butterflies together
Card Size: 

Sunday, June 28, 2009

Wishing you a happy heart - blue

Tonings of blue along with the whisper white gives a crisp finish to this card.

Simple layering of colours and paper sizing help to draw the eye to the centre focus which is the dandelion and the small hearts floating away.  The white ribbon and rub on help with the finishing touches.

Hope you like it.  Keep smiling.....Ann

RECIPE:
Stamps: A Happy Heart
Paper: Bella Bleu DSP, at-home blue textured cardstock, whisper white cardstock
Ink: Versamark and white embossing powder
Accessories: rub on birthday sentiment, white 1/4" grosgrain ribbon
Tools: heat embossing tool, paper piercing tool
Card Size: 15 x 10.5 cm

Wednesday, May 20, 2009

Bloomin' with Beauty


The smaller blue and pink cards were cased from Andrea Walford a Canadian SU demonstrator whom I thank.  These look lovely in real life and again just need the addition of a sentiment to finish them off.

I experimented with the wonderful words set, using the 'thankyou' as the flower stem; I was happy with the finished look.  The flower head is stamped three times in basic black, snipped out, and layered giving a 3D effect using dimensions.  It really does work well.

Hope you like it.
Keep smiling......Ann
RECIPE:
Stamps:  Bloomin with Beauty, Wonderful Words
Paper: At-home textured blue and pink cardstock
Ink: basic black
Accessories: Basic Grey taffeta ribbon
Tools: SU Write markers, dimensions, Horizontal slot punch for ribbon thread hole, stamp-a-ma-jig
Card Size:  Smaller:  15 x 10.5 cm - Larger:  21 x 10 cm - fits a DL size envelope